I continue from the previous post about the vacuum tube amplifier that I bought cheap. In my initial inspection, this KT88 based vacuum tube amplifier is made with all used components inside. You might not willing to turn this amplifier ON with this poor safety condition.
Further inspection, I found that this amplifier is a single ended KT88 with large output transformer. No wonder why this amplifier sound so wonderful.
In this post I will share the schematic along with replacing almost all the components inside that I think they are all junk.

I will start with the schematic first. I did this drawing because I need to make sure all components that will be replace are place at the same location. This drawing also help me to study this amplifier working principle. It also easy for me to understand on which components need special attention and need to be change to the better quality.
Let's start with the drawing of this amplifier.

This amplifier using 5U4 tube rectifier, 6DJ8 and 6H8C as the gain stage.
The next one is the schematic.
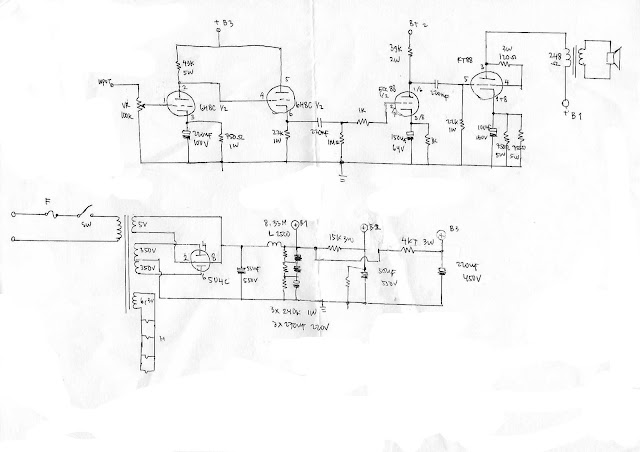
Now you can see there are 3 stages in this amplifier. The first one is the SRPP configuration using 6H8C. This stage also act as the gain stage. The second stage is the buffer using 6DJ8. The third stage is the single ended amplifier using KT88.
As I mention on my previous post that I can see clearly the story behind this built just by looking to the unit. I can see that the second stage, the 6DJ8 is the components added after this amplifier is completely built.
Why I say so? The first sign is because the 6DJ8 are dual triode, so for this stereo application, only one vacuum tube is needed. Unfortunately, this amplifier using 2 of 6DJ8, each of them are only use by half of it. They are put on each side of the chassis and this is because there is not enough room at the center of the chassis. Ironically, the owner insist to adding it.

The other sign of this 6DJ8 is added later after this vacuum tube amplifier are fully built is the holes made for the 6DJ8 tube sockets are not as sleek as the others. This is very normal appearances compares if it made from the first time built.
I don't know why the owner made this additional stage. I think it will increase the gain of this amplifier. Or perhaps the first owner who built it is a different person to another one who add the 6DJ8 on it.
So what I will do now is changing the internal components with the better one. It all start with removing the old one, then I try to clean the internal chassis as much as I can.


I also change all the cables. The best cable for this high voltage application is silver coated copper cable with Teflon jacket.
The photos bellow is the steps of the changing every components inside. You can see clearly from the first photo to the last one is now so much different in components arrangement.


It is not just look tidy, it is safe to operate without worries about risk of any short-circuit.
I think this is all done inside. Then I start to clean up the exterior by repaint the chassis, polish the wood panel, and change all the bolts. Right now this amplifier look as good as the new one.


It is time to put all vacuum tubes in it's place and this amplifier is now ready to sing again on my listening room.


Comments
Post a Comment