Continue from the previous upgrade of the Bottlehead Crack amplifier using the Speedball kit, in my opinion, it is a worth upgrade from the standard version, especially if you really like the sound of this amplifier out of the box. Speedball upgrade doesn't change the sound signature, but it makes the background noise reduce.
Then, the further upgrade is of course by changing the output capacitor. The electrolytic type capacitor using in the original Bottlehead Crack package is well known for unstable and low tolerance in the value, yet high ESR that impact to the sound quality. Since this output capacitor is the vital components in this Bottlehead Crack amplifier, then changing with the better quality will improve the sound quality, I hope:)
For sure I am still using the electrolytic capacitor as the audio signal coupling in many audio project. The advantage from using it is the smaller size and they sound acceptable.
The initial planning for this capacitor upgrade is actually finding the Elna Silmic capacitor, but regret I couldn't find one with this high rating voltage. So, since the space inside of this Bottlehead Crack amplifier is quite plenty, using the big film capacitor is another better option.
As you can see I am using the 100uF 250 volt Mundorf M-CAP capacitor. The size is big, very big and almost forty times bigger than the electrolytic one. If you have plan to change to this film capacitor like I do, I guess you should also consider the price for this capacitor each is US$35 and since we need two, then US$70 you should spend for it. I couldn't find the better option and better price point for finding other audio grade capacitor like this.
Before installation, I measure the film capacitor value. It gives the better value result over the electrolytic one. The ESR value on film capacitor is much lower and of course, there is no voltage loss compare to the electrolytic one.
This is the electrolytic capacitor measurement. This photo is taken after I remove the original capacitor from the amplifier.
The first attempt I did to this capacitor is sleeve the leads to avoid any short circuit to other components or metal object.
I un-screw the bolt on the middle Speedball kit to makes it lift a little bit for easy access installing the capacitors.
Once I got enough room, then I remove the electrolytic capacitor, which in this photo, it is located on terminal 9U and 10U.
The other channel capacitor is located at terminal 6U and 7U.
I using 3M double side tape to secure the new capacitor into the chassis. This tape is strong enough to hold this big capacitor.
Unlike the electrolytic capacitor that have polarity to be concern when installing, the film capacitor is non-polarity capacitor. Both leads are free to connect to any terminal.
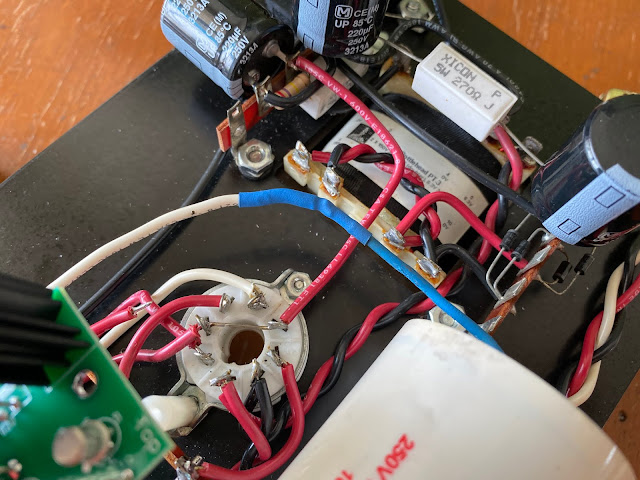
As you can see the terminal 9U goes to the film capacitor. I also take out the cable attached on terminal 10U which connect to the headphones output jack.
Then the cable taken out from terminal 10U connect directly to the other film capacitor lead. This approach will delete the extra cable length needed to extend the film capacitor lead to the terminal 10U.
Same procedure for the other side. Terminal 7U to the one film capacitor lead, the cable from terminal 6U detach, then leave it unused.
This is where the terminal 6U and 10U cable goes to. It is to the headphones jack connected directly to the output film capacitor.
Look how beefy the layout now.
The first time I connect this Bottlehead Crack amplifier to the system, it makes no sound for a while. This brand new M-Cap film capacitor never been use before and it need 2 second to re-charge internally, then the music flows. I think it is very normal because the character of the capacitor itself. I let it burn-in for an hour before I start my listening session.
In this test I am using Chod Mojo connected to my smartphone using USB Audio Player Pro app and using Sennheiser HD600 or Beyerdynamic T1 headphones. The music played are variated from 16 bit CD ripped to FLAC and DSD music files.
My initial impression using film capacitor makes sound more open at high frequency. It is more transparent in music presentation and feels the music more dynamic, yet fast to catch the rhythms. I feel the vocal sound still warm and liquid enough just like the vacuum tube amplifier behavior. The bass sound little bit boomy and less separation. I guess this is because the film capacitor it self not yet fully burn-in. But overall sound have good improvement. I should keep this amplifier running for at least 100 hours to reveal the true potential of this upgrade.
Disclaimer: Any statement and photos in this article are not allowed to copy or publish without written permission from the writer. Any injury or loss from following tips in this article is not under writer responsibility.


Comments
Post a Comment