Since last month, I spent so much time listen to the music with this great sounding vacuum tube amplifier.
I got this unit in second hand condition so it is required for me to clean up when it comes to my desk. I also checked the internal circuit, which the previous owner make some changes for no particular reason compares to the original schematic.
More about this amplifier, it is released around 2013. It is very simple vacuum tube headphone amplifier schematic called the Bottlehead Crack headphone amplifier. This is actually a DIY project and comes with very clear step by step online instruction. So far I am very satisfied with the sound quality and I don't think there is no need for me to make any upgrade.
But for aiming the perfection, I guess spending a little bit cash for this additional kit is rewarding.
Let's see this Speedball Kit Upgrade:)
After a month waiting, this Speedball kit arrived on my doorstep. This kit is all complete with the required components and accessories to install into the amplifier.
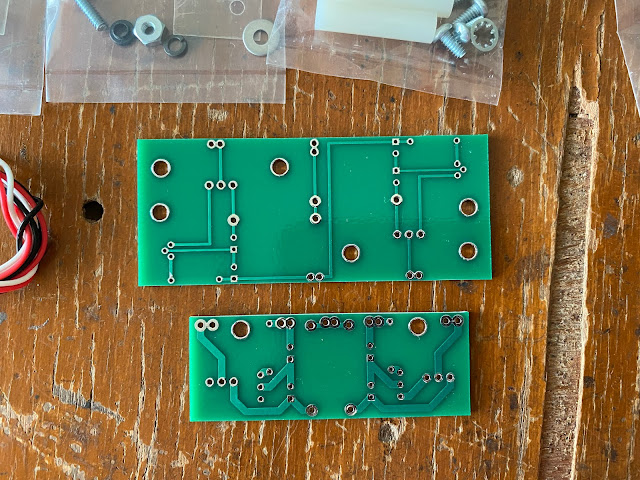
The PCB quality, as per my expectation, is superb.
I've read and learn how this Speedball circuit works on the Bottlehead Crack, and it is actually a DC voltage regulator feeding to each vacuum tube, replacing the resistors.
This is the schematic for the Speedball Kit.
When using only a resistor to each vacuum tube, it is not rejecting the noise from the power supply perfectly. Compares when using the regulator like this Speedball Kit was intended, it is far better for sure.
I guess no need for me to repeat what it already explain on the Speedball kit manual.
I spend an hour to complete all the installation to the Bottlehead Crack amplifier.
A quick check after the installation, it paying music perfectly.
Now let's do the serious sound audition.
Perhaps if you a DIY audio person for quite some time, you probably had an experience when using a voltage regulator circuit on the amplifier circuit. This regulator voltage clean the DC output and the result is less audible noise to the amplifier.
This condition is also applied in this Bottlehead Crack using the Speedball Kit. From my last post
here replacing the vacuum tube to the new old stock reduce the hum noise, but it is still there. The hum noise is notice when the amplifier is on idle, means it is operate without any signal present.
Using this kit eliminate the hum noise. I did not notice any noise occurs right now. It is just like a dead amplifier. Then when I hit the Play on the source, the noticeable improvement using this kit is the darker music background, it makes the music more reveal and clean. It sound sweet, just like vacuum tube amplifier should behave, but cleaner.
The question is this upgrade rewarding?
In my opinion, yes.
The amplifier get a better sound quality with it but don't expecting a huge improvement.
The Speedball kit doesn't change the sound signature of the Bottlehead Crack amplifier. This kit makes sound better and reveal because of cleaner background.
Disclaimer: Any statement and photos in this article are not allowed to copy or publish without written permission from the writer. Any injury or loss from following tips in this article is not under writer responsibility.


.jpg)


Comments
Post a Comment