This balanced headphones cables is a parallel project with balanced headphones amplifier. Sennheiser HD6XX is a good performance headphones. It really love high power to drive it on it's true potential. This is because the impedance of this Sennheiser HD6XX is 300 ohm. Mostly for this high impedance headphones are use by the professional audio. For sure the power output from most digital audio player cannot drive well this headphones, thus not brings the true potential of this headphones either. That is why this balanced headphones cable for Sennheiser HD6XX project is come in before the amplifier. Approaching by using a balanced cable to Sennheiser HD6XX headphones is to double up the power since both polarity of signal wave are amplified. Another advantage from balanced headphones cable is by nature the noise should be reduced and better compares to the single ended cables.

The parts to make this balanced cable are quite simple. The first part you need to consider is the Sennheiser connector type. Fortunately it is widely available.

The connector for balanced headphones cables that connect to the amplifier is not having one standard type. There is a lot of option from mini jack 4 pole TRRS 2.5 mm up to 4.4 mm and also the XLR 4 pin which I prefer in this project. The reason I choose this XLR 4 pin is because it is more common for professional audio use. The pin out of the XLR is also easy to work with because of the big pin size compares to the mini jack.

Going to the cables is a personal preference. I am using the Canare interconnect cable for this headphones project. This cables is cheap, yet the quality is good. You can pick whatever cables you want.

I compares the OEM connector with the original Sennheiser on the left. The quality from OEM connector is not as good as the original but it can be worked very well. If this quality doesn't enough for you, please check the product from Acrolink. They also sell the Sennheiser HD series connector with much better quality than this OEM product.

This is the main different between single ended cables and balanced cables. In the single ended cables like the photo bellow has a connection link on both channel in the negative terminal. The ground is shared for each channel. Testing with the ohm meter will read as zero ohm. But in the balanced cables they are all separated.

The XLR 4 pin that I am using is China made, copy from Neutrik. This product is very good on the material quality with very affordable price.

The first step that I am doing is make 2 stains of Canare cables. Each strains length is 1.5 meter. Then peel the cables jacket and simply take out the core cables. Each stains contain 2 core cables and ground. Each strains is for each channel, the red color is positive and the white color is negative. The ground is joining together for isolated the signal line from outside noise interfere.

On the XLR solder side, there are numerical code for each pin except the ground. This is the common pin out for balanced XLR cable:
Pin 1 = Left Channel Positive
Pin 2 = Left Channel Negative
Pin 3 = Right Channel Positive
Pin 4 = Right Channel Negative

After solder the cable to the XLR pin, remember on the others cables end to mark on the left or right channel. I using colored heat shrink tube to mark each cables.

Now preparing the Sennheiser connector.

Same as above procedure, peel of the cables jacket and take only the core cables. The ground is not needed at the headphones jack, so leave it unconnected.

The good point from this OEM connector is the polarity mark on it. So follow the color code and solder the cables to the connector pins.

Close the connector cover. I secured it with extra quick drying glue.

And here it is, the finished XLR balanced headphones cables.


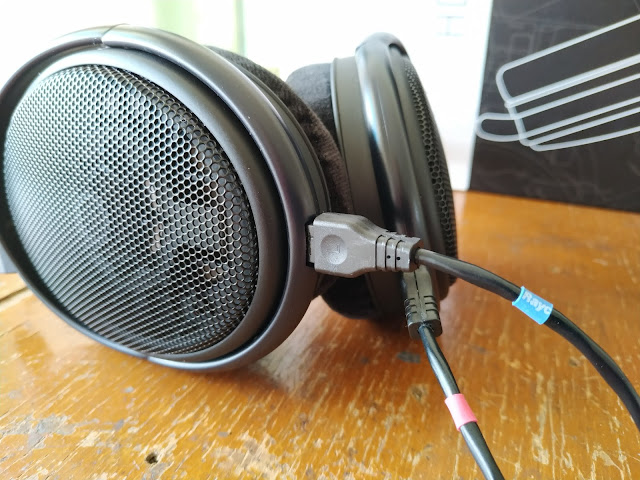

I think this is a very nice looking balanced headphones cables. Choosing Canare cables as a headphones cables is a good choice. It is perfectly fit for this headphones cables and it also has good stiffness, of course without sacrifice the comfortable when wearing it.
Disclaimer: Any statement and photos in this article are not allowed to copy or publish without written permission from the writer. Any injury or loss from following tips in this article is not under writer responsibility.
The parts to make this balanced cable are quite simple. The first part you need to consider is the Sennheiser connector type. Fortunately it is widely available.
The connector for balanced headphones cables that connect to the amplifier is not having one standard type. There is a lot of option from mini jack 4 pole TRRS 2.5 mm up to 4.4 mm and also the XLR 4 pin which I prefer in this project. The reason I choose this XLR 4 pin is because it is more common for professional audio use. The pin out of the XLR is also easy to work with because of the big pin size compares to the mini jack.
Going to the cables is a personal preference. I am using the Canare interconnect cable for this headphones project. This cables is cheap, yet the quality is good. You can pick whatever cables you want.
I compares the OEM connector with the original Sennheiser on the left. The quality from OEM connector is not as good as the original but it can be worked very well. If this quality doesn't enough for you, please check the product from Acrolink. They also sell the Sennheiser HD series connector with much better quality than this OEM product.
This is the main different between single ended cables and balanced cables. In the single ended cables like the photo bellow has a connection link on both channel in the negative terminal. The ground is shared for each channel. Testing with the ohm meter will read as zero ohm. But in the balanced cables they are all separated.
The XLR 4 pin that I am using is China made, copy from Neutrik. This product is very good on the material quality with very affordable price.
The first step that I am doing is make 2 stains of Canare cables. Each strains length is 1.5 meter. Then peel the cables jacket and simply take out the core cables. Each stains contain 2 core cables and ground. Each strains is for each channel, the red color is positive and the white color is negative. The ground is joining together for isolated the signal line from outside noise interfere.
On the XLR solder side, there are numerical code for each pin except the ground. This is the common pin out for balanced XLR cable:
Pin 1 = Left Channel Positive
Pin 2 = Left Channel Negative
Pin 3 = Right Channel Positive
Pin 4 = Right Channel Negative
After solder the cable to the XLR pin, remember on the others cables end to mark on the left or right channel. I using colored heat shrink tube to mark each cables.
Now preparing the Sennheiser connector.
Same as above procedure, peel of the cables jacket and take only the core cables. The ground is not needed at the headphones jack, so leave it unconnected.
The good point from this OEM connector is the polarity mark on it. So follow the color code and solder the cables to the connector pins.
Close the connector cover. I secured it with extra quick drying glue.
And here it is, the finished XLR balanced headphones cables.


I think this is a very nice looking balanced headphones cables. Choosing Canare cables as a headphones cables is a good choice. It is perfectly fit for this headphones cables and it also has good stiffness, of course without sacrifice the comfortable when wearing it.
Disclaimer: Any statement and photos in this article are not allowed to copy or publish without written permission from the writer. Any injury or loss from following tips in this article is not under writer responsibility.
Comments
Post a Comment