The surround sound technology in home theater entertainment system has improve very fast. Compares to the stereo system, it is just like an ancient electronic setup to the surround. The latest surround system is now Dolby Atmos which will create the sound field from the speaker above the listener. The previous surround system are DTS and Dolby digital. But do the latest surround system is essential in home theater setup? How could I compare to the first Dolby surround system introduced in 80's? Do they still capable to deliver the enjoyment in the latest movies? I am now have a spare time to dig something on my storage room. Lets see what I can find to build my own simple surround system for cheap!

It is all started from this surround system pre-amp board.

This is fully analog 5.1 surround system using quad op-amp.

Here is the full schematic of this surround system. It is pretty simple. They are pairs of analog input divided between left and right to create wider effect for the front channel. There is also the join between channel with mid-range filter to create the center channel. And there is joining channel with low-pass filter to create the sub-woofer channel.

The rear channel is create by phase cancellation between left and right, so in-phase audio from the recording will create the surround sound. That surround sound is then delayed for more three dimensional surround effect. Unfortunately the IC for MN series are not longer exists. So I skip the delay section which I am sure without it, the pleasure of surround setup still could be achieve.

All material are taken from my bin. They are used amp steel case, a used toroidal transformer, and many others used parts. The total cost for this project is only time:)

I make a hole for secure this pcb on the case.

It is now the fun step, install all components on the board. Solder them all and no need to think about the schematic unlike doing point-to-point amp like I used to do it.


Always measure the length of the components before install them to the board. Make sure they fit in the case.


Bad focus from my poor camera. Actually I want to focus on my Elna Silmic capacitor installed in the signal input stages.

Almost done.

The op-amp IC are from JRC A4004. They are quad-opamp on single package as I mentioned above.

I am installing the input-output wire and the potentiometer.

Something missed I guess.

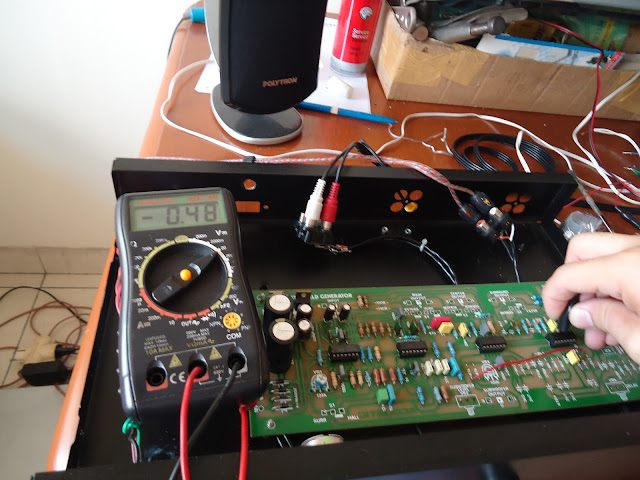
There is no sound coming other than the front channel. I checking the problem by testing the voltage one by one and find that some traces is wrong. There is no voltage rail connector on the fourth op-amp IC.
Actually there are many others mistakes from this board and they need to be fix by compare to the original schematic.

Did I ever mentioned before about not using the board like this for the hi-end audio? Now you know why the bad pcb can ruin your whole system. Not because the traces are bad but the connector material of the traces are actually low quality cooper.
Since from the beginning this project is to having fun with surround system, so I don't mind to using it either. Let's continue.
Every channel is now working properly and ready to install. I took my testing speakers from old multimedia speakers. They are the Logitech and the Polytron speakers (local audio brand). The sub-woofer is from Sony TV-subwoofer. And the power amplifier are from small car amplifier powered from modified PC power supply.
How does they sound? I will post it later after I finished watching my favorite movie: the Batman! Part 2 final can be find here

Disclaimer: Any statement and photos in this article are not allowed to copy or publish without written permission from the writer. Any injury or loss from following tips in this article is not under writer responsibility.
It is all started from this surround system pre-amp board.
This is fully analog 5.1 surround system using quad op-amp.
Here is the full schematic of this surround system. It is pretty simple. They are pairs of analog input divided between left and right to create wider effect for the front channel. There is also the join between channel with mid-range filter to create the center channel. And there is joining channel with low-pass filter to create the sub-woofer channel.

The rear channel is create by phase cancellation between left and right, so in-phase audio from the recording will create the surround sound. That surround sound is then delayed for more three dimensional surround effect. Unfortunately the IC for MN series are not longer exists. So I skip the delay section which I am sure without it, the pleasure of surround setup still could be achieve.
All material are taken from my bin. They are used amp steel case, a used toroidal transformer, and many others used parts. The total cost for this project is only time:)
I make a hole for secure this pcb on the case.
It is now the fun step, install all components on the board. Solder them all and no need to think about the schematic unlike doing point-to-point amp like I used to do it.
Always measure the length of the components before install them to the board. Make sure they fit in the case.
Bad focus from my poor camera. Actually I want to focus on my Elna Silmic capacitor installed in the signal input stages.
Almost done.
I am installing the input-output wire and the potentiometer.
Something missed I guess.
There is no sound coming other than the front channel. I checking the problem by testing the voltage one by one and find that some traces is wrong. There is no voltage rail connector on the fourth op-amp IC.
Actually there are many others mistakes from this board and they need to be fix by compare to the original schematic.
Did I ever mentioned before about not using the board like this for the hi-end audio? Now you know why the bad pcb can ruin your whole system. Not because the traces are bad but the connector material of the traces are actually low quality cooper.
Since from the beginning this project is to having fun with surround system, so I don't mind to using it either. Let's continue.
Every channel is now working properly and ready to install. I took my testing speakers from old multimedia speakers. They are the Logitech and the Polytron speakers (local audio brand). The sub-woofer is from Sony TV-subwoofer. And the power amplifier are from small car amplifier powered from modified PC power supply.
How does they sound? I will post it later after I finished watching my favorite movie: the Batman! Part 2 final can be find here
Disclaimer: Any statement and photos in this article are not allowed to copy or publish without written permission from the writer. Any injury or loss from following tips in this article is not under writer responsibility.
Good Image and Article!
ReplyDeleteSmart Home Automation in NJ
Really enjoyed this DIY project! It's impressive how you repurposed old components to create a functional and immersive home theater system. A great example of creativity and resourcefulness.
ReplyDeleteStereo System